How to Pixelate Images in Go
Language
- unknown
by James (Golang Project Structure Admin)
When an image is pixelated, it has a visual effect applied to reduce its level of detail through the use of many same-sized blocks, each painted with a single colour. Each of those blocks can be thought of as a large pixel (since a pixel is the smallest unit that can contain a colour in computer graphics), hence why the image is said to have been pixelated.
Before we begin, let’s clearly define our terms. Pixelation is a general term that can also refer to displaying low-resolution bitmap images at a high level of zoom, so that their pixels unintentionally appear blocky. When an image is intentionally pixelated, however, it is sometimes said to have undergone a process of pixelization, which is the more specific term.
In the following sections, we will be discussing how to pixelate an image intentionally, in order to produce a distinctive visual effect. So we will be creating our own simple pixelization algorithms.
(I will use the two terms — pixelation and pixelization — interchangeably in this post, since they both apply to the code we’re going to write, but it is still useful to understand the slightly technical distinction between them.)
Table of Contents
Make Sure You Read the Previous Post
This is the second post in a two-part series. The first post discussed various ways to calculate the average colour of an image. It is important that you read that, if you haven’t already, as the examples below build heavily on material that was first discussed there.
We are going to manipulate the image of the painting (Girl With a Dog) by Berthe Morisot that we used in the previous post. We will also use the calculateMeanAverageColour and calculateMeanAverageColourWithRect functions that we created there in our example code here, so make sure you look back at how they work.
A Simple Function to Pixelate Our Image
Let’s being by looking at a first attempt to pixelize our image using the pixelate function defined below:
package main

import (
	"image"
	"image/color"
	_ "image/jpeg"
	"image/png"
	"log"
	"math"
	"os"
)

func calculateMeanAverageColourWithRect(
	img image.Image,
	rect image.Rectangle,
	useSquaredAverage bool,
) (red, green, blue uint8)

func pixelate(img image.Image, size int) image.Image {
	imgBounds := img.Bounds()
	imgWidth := imgBounds.Max.X
	imgHeight := imgBounds.Max.Y

	pixelatedImg := image.NewRGBA(image.Rect(0, 0, imgWidth, imgHeight))

	for x := 0; x < imgWidth; x += size {
		for y := 0; y < imgHeight; y += size {
			rect := image.Rect(x, y, x+size, y+size)

			if rect.Max.X > imgWidth {
				rect.Max.X = imgWidth
			}
			if rect.Max.Y > imgHeight {
				rect.Max.Y = imgHeight
			}

			r, g, b := calculateMeanAverageColourWithRect(img, rect, true)
			col := color.RGBA{r, g, b, 255}

			for x2 := rect.Min.X; x2 < rect.Max.X; x2++ {
				for y2 := rect.Min.Y; y2 < rect.Max.Y; y2++ {
					pixelatedImg.Set(x2, y2, col)
				}
			}
		}
	}

	return pixelatedImg
}

func main() {
	file, err := os.Open("girl-with-a-dog-by-berthe-morisot.jpg")
	if err != nil {
		log.Fatalln(err)
	}
	defer file.Close()

	img, _, err := image.Decode(file)
	if err != nil {
		log.Fatalln(err)
	}

	img = pixelate(img, 60)

	outputFile, err := os.Create("output.png")
	if err != nil {
		log.Fatalln(err)
	}
	defer outputFile.Close()

	err = png.Encode(outputFile, img)
	if err != nil {
		log.Fatalln(err)
	}
}
Within the pixelate function, shown above, we create a new image (using the image.NewRGBA function) that is the same size as the original image that is passed as an argument. This is so that we don’t modify the original unnecessarily.
Then we iterate through the x and y dimensions, incrementing our counter by the size of one edge of the square that we’ll be using as our pixelation unit. We calculate the average colour within that square using the calculateMeanAverageColourWithRect function that we defined previously, then we set all of the pixels within those bounds in our new image to that single colour.
There is also a pair of conditional checks to make sure that the bounds of the square are not beyond the width and height of the image. This is necessary if the size of the square is not exactly divisible by the size of the image. In this case, the squares will all be the same size, except for those on the right-most and bottom-most borders, which will be squashed into smaller rectangles, as you can see in the output image below:
The original image has, through the use of simple Golang code, now been pixelated using squares that are each sixty pixels long and sixty pixels high.
It’s an elegant effect, because we can clearly see the outline of a human figure next to the smaller brown dog, as well as the green foliage behind them, but we can’t see anything in enough detail to identify exactly what is taking place or who is involved.
This is why pixelization algorithms are most commonly used to protect people’s privacy. You’ll often see pixelated photos used on news or celebrity websites when they don’t legally have permission to show the person that they’ve snapped an image of. They can also be used for purposes of discretion, to hide something obscene or particularly rude.
Tidying up Our Pixelation Function
In this next section, we are going to make some minor improvements to our pixelate function, making the code nicer to read and potentially more performant. Have a look at the updated function below:
package main

import (
	"image"
	"image/color"
	_ "image/jpeg"
	"math"
	"os"
)

func calculateMeanAverageColour(
	img image.Image,
	useSquaredAverage bool,
) (red, green, blue uint8)

func calculateMeanAverageColourWithRect(
	img image.Image,
	rect image.Rectangle,
	useSquaredAverage bool,
) (red, green, blue uint8)

func pixelate(
	img image.Image,
	size int,
	useSquaredAverage bool,
) image.Image {
	imgBounds := img.Bounds()
	imgWidth := imgBounds.Max.X
	imgHeight := imgBounds.Max.Y

	var sizeFillsImg bool
	if imgWidth > imgHeight {
		if size > imgWidth {
			size = imgWidth
			sizeFillsImg = true
		}
	} else {
		if size > imgHeight {
			size = imgHeight
			sizeFillsImg = true
		}
	}

	if size < 1 {
		size = 1
	}

	pixelatedImg := image.NewRGBA(image.Rect(0, 0, imgWidth, imgHeight))

	if size == 1 {
		for x := 0; x < imgWidth; x++ {
			for y := 0; y < imgHeight; y++ {
				pixel := img.At(x, y)
				col := color.RGBAModel.Convert(pixel).(color.RGBA)

				pixelatedImg.Set(x, y, col)
			}
		}
	} else if sizeFillsImg {
		r, g, b := calculateMeanAverageColour(img, useSquaredAverage)
		col := color.RGBA{r, g, b, 255}

		for x := 0; x < imgWidth; x++ {
			for y := 0; y < imgHeight; y++ {
				pixelatedImg.Set(x, y, col)
			}
		}
	} else {
		centerX := imgWidth / 2
		centerY := imgHeight / 2

		startX := centerX % size
		if startX != 0 {
			startX -= size
		}
		startY := centerY % size
		if startY != 0 {
			startY -= size
		}

		for x := startX; x < imgWidth; x += size {
			for y := startY; y < imgHeight; y += size {
				rect := image.Rect(x, y, x+size, y+size)

				if rect.Min.X < 0 {
					rect.Min.X = 0
				}
				if rect.Max.X > imgWidth {
					rect.Max.X = imgWidth
				}
				if rect.Min.Y < 0 {
					rect.Min.Y = 0
				}
				if rect.Max.Y > imgHeight {
					rect.Max.Y = imgHeight
				}

				r, g, b := calculateMeanAverageColourWithRect(img, rect, useSquaredAverage)
				col := color.RGBA{r, g, b, 255}

				for x2 := rect.Min.X; x2 < rect.Max.X; x2++ {
					for y2 := rect.Min.Y; y2 < rect.Max.Y; y2++ {
						pixelatedImg.Set(x2, y2, col)
					}
				}
			}
		}
	}

	return pixelatedImg
}
You can see that we now have some validation checks, making sure that the value of the size argument does not exceed the width or height of the image; we also check that size is at least one, since it doesn’t make sense to pixelate the image with zero-sized blocks (or with blocks of a negative size).
If size is greater than whichever of the image’s width or height is greater, we set the boolean variable sizeFillsImg to true, so we can modify the algorithm used later, since the image will only be made up of one single block.
If size is set to one, then that’s equivalent to no pixelation at all, since the average colour of a one-by-one square is always going to be the colour of a single pixel, so the image will be identical. However, we do still need to set each pixel in our new image, so we simply iterate through all the pixels in the original image and set the new pixel the corresponding colour.
On the other hand, if sizeFillsImg is true, as we mentioned earlier, the new image will only contain one large block that encompasses all of the pixels. So in that case, we simply need to calculate an average colour for the entire image and set all of the pixels in the new image to that colour.
We use the same pixelation algorithm that we used in the previous example, if neither of these conditions is true. However, there is one major difference. Have a look at the output image below and see if you can spot it:
The blocks at the edges are now aligned symmetrically. If the size of the block is not divisible into both the width and height of the image, some of the blocks at the edge will necessarily be smaller in size and more rectangular (because there isn’t room for the full square to be seen).
In our previous code, we simply started at the top-left and iterated towards the bottom-right, meaning that any smaller blocks would always be at the right or bottom of the image. However, now we calculate startX and startY variables that will ensure that the blocks at the top and bottom edges will be the same size, as will the blocks at the left and right edges.
This arguably makes the whole effect look neater and more professionally done. However, if you like the positioning to start from the top-left as it did in the previous version, you could simply add a boolean argument to the pixelate function that determines whether or not the blocks at the edges will be symmetrically distributed.
Use the Pixelate Your Images Online Application
When I was working on this post, I spent some time creating an online tool that you can use to pixelate images whenever you want.
It’s not designed to do anything particularly advanced, but it is effective. It uses the same algorithm that we discussed above when we looked at the examples in Go, but the code is written in Typescript (using HTML canvas for image manipulation).
Click on the image below to visit the Pixelate Your Images tool:
You simply need to select a size for the pixelization blocks using the slider and then you can drag-and-drop your image onto the area with the dotted border (or click on the “Select an Image” button to open the file browser).
Once you’ve previewed the pixelated image and made sure that you like the effect, you can download a PNG version of it to keep and use however you like. If, on the other hand, the pixelization blocks appear too big or too small, you can go back to change the size before repixelating the image.
Only Pixelating Specific Areas of the Image
In the previous post, we worked out the average colour of an image when taking into consideration all of the pixels within multiple rectangle-bounded areas. Now we are going to do something similar using pixelation.
This may seem like an abstract exercise, but this is probably the form of pixelation with the most real-world applications. For example, a journalist may have a photo of a group of people at a party, not all of whom want their faces to be published in the newspaper. So it would be useful to be able to select rectangles around each of the unwanted faces and only pixelate those areas, leaving the rest of the image as it was originally. Protecting people’s right to privacy is important, so it’s nice to have code available that makes it straightforward.
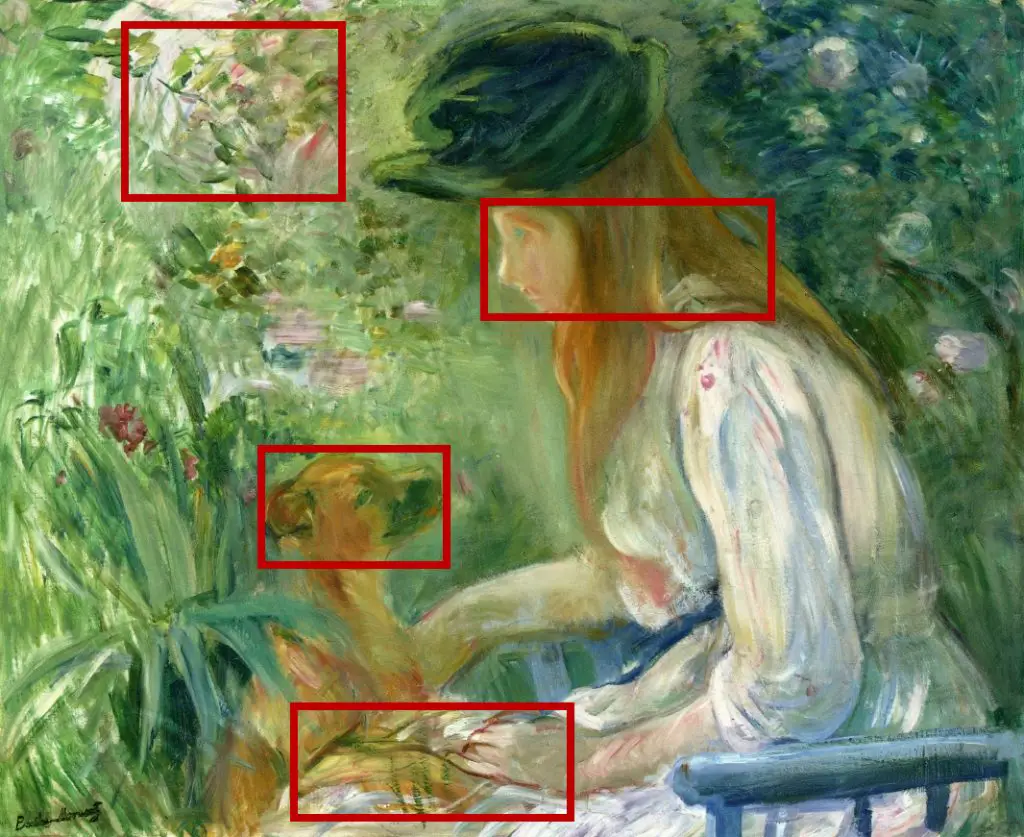
In the image above, you can see the areas (within the red rectangles) of our original image that we are going to pixelate. (They are the same areas that we used in the average-colour example in the previous post.)
The code example below applies our pixelization algorithm to those four areas of the image that we’ve chosen:
package main

import (
	"image"
	"image/color"
	_ "image/jpeg"
	"image/png"
	"log"
	"math"
	"os"
)

func calculateMeanAverageColour(
	img image.Image,
	useSquaredAverage bool,
) (red, green, blue uint8)

func calculateMeanAverageColourWithRect(
	img image.Image,
	rect image.Rectangle,
	useSquaredAverage bool,
) (red, green, blue uint8)

func pixelateWithRects(
	img image.Image,
	size int,
	rects []image.Rectangle,
) image.Image {
	imgBounds := img.Bounds()
	imgWidth := imgBounds.Max.X
	imgHeight := imgBounds.Max.Y

	if imgWidth > imgHeight {
		if size > imgWidth {
			size = imgWidth
		}
	} else if size > imgHeight {
		size = imgHeight
	}

	if size < 1 {
		size = 1
	}

	pixelatedImg := image.NewRGBA(image.Rect(0, 0, imgWidth, imgHeight))

	for x := 0; x < imgWidth; x++ {
		for y := 0; y < imgHeight; y++ {
			pixel := img.At(x, y)
			col := color.RGBAModel.Convert(pixel).(color.RGBA)

			pixelatedImg.Set(x, y, col)
		}
	}

	if size == 1 {
		return pixelatedImg
	}

	for _, pixelationRect := range rects {
		pixelationRectWidth := pixelationRect.Dx() + 1
		pixelationRectHeight := pixelationRect.Dy() + 1

		var sizeFillsPixelationRect bool

		if pixelationRectWidth > pixelationRectHeight {
			if size >= pixelationRectWidth {
				sizeFillsPixelationRect = true
			}
		} else {
			if size >= pixelationRectHeight {
				sizeFillsPixelationRect = true
			}
		}

		if sizeFillsPixelationRect {
			r, g, b := calculateMeanAverageColourWithRect(img, pixelationRect, true)
			col := color.RGBA{r, g, b, 255}

			for x2 := pixelationRect.Min.X; x2 < pixelationRect.Max.X; x2++ {
				for y2 := pixelationRect.Min.Y; y2 < pixelationRect.Max.Y; y2++ {
					pixelatedImg.Set(x2, y2, col)
				}
			}
		} else {
			centerX := pixelationRectWidth/2 + pixelationRect.Min.X
			centerY := pixelationRectHeight/2 + pixelationRect.Min.Y

			startX := centerX % size
			if startX != 0 {
				startX -= size
			}
			startY := centerY % size
			if startY != 0 {
				startY -= size
			}

			for x := startX; x <= pixelationRect.Max.X; x += size {
				for y := startY; y <= pixelationRect.Max.Y; y += size {
					blockRect := image.Rect(x, y, x+size, y+size)

					if blockRect.Min.X < pixelationRect.Min.X {
						blockRect.Min.X = pixelationRect.Min.X
					}
					if blockRect.Max.X > pixelationRect.Max.X {
						blockRect.Max.X = pixelationRect.Max.X
					}
					if blockRect.Min.Y < pixelationRect.Min.Y {
						blockRect.Min.Y = pixelationRect.Min.Y
					}
					if blockRect.Max.Y > pixelationRect.Max.Y {
						blockRect.Max.Y = pixelationRect.Max.Y
					}

					r, g, b := calculateMeanAverageColourWithRect(img, blockRect, true)
					col := color.RGBA{r, g, b, 255}

					for x2 := blockRect.Min.X; x2 < blockRect.Max.X; x2++ {
						for y2 := blockRect.Min.Y; y2 < blockRect.Max.Y; y2++ {
							pixelatedImg.Set(x2, y2, col)
						}
					}
				}
			}
		}
	}

	return pixelatedImg
}

func main() {
	file, err := os.Open("girl-with-a-dog-by-berthe-morisot.jpg")
	if err != nil {
		log.Fatalln(err)
	}
	defer file.Close()

	img, _, err := image.Decode(file)
	if err != nil {
		log.Fatalln(err)
	}

	rects := []image.Rectangle{
		image.Rect(272, 467, 465, 588), // dog's face
		image.Rect(504, 210, 803, 330), // girl's face
		image.Rect(306, 735, 594, 851), // dog's paw and girl's hand
		image.Rect(130, 26, 356, 206),  // floral patch
	}

	img = pixelateWithRects(img, 60, rects)

	outputFile, err := os.Create("output.png")
	if err != nil {
		log.Fatalln(err)
	}
	defer outputFile.Close()

	err = png.Encode(outputFile, img)
	if err != nil {
		log.Fatalln(err)
	}
}
This pixelateWithRects function utilizes many of the same techniques as we saw before, just applied to each of the rectangle-defined areas rather than the whole image.
Before doing anything, we first set all of the pixels in the new image to the same colour as the corresponding pixels in the original image. This is easier than calculating all of the areas that are not within the rectangles and only setting those pixels, but we could have taken that approach, if we cared about squeezing every last drop of efficiency from our code.
The function above performs fast enough that it’s not an extremely pressing problem if we set a pixel to one colour only to overwrite it later with another. Sometimes it’s perfectly acceptable to choose an approach that makes the code easier and faster to write, if there aren’t any major costs incurred in doing so.
If the size parameter is set to one (or lower), we return early, since there’s no pixelization work to be done.
However, the pixelateWithRects function is intended to be called with size set to greater than one, so in most cases the function will continue. We validate the size of the block, ensuring that it is no larger than the largest dimension of the rectangle. If the block-size fills the entire rectangle, then we simply calculate a single average colour for the rectangle and set the entire area to that colour.
Otherwise, we rely on the algorithm that we used in the previous section for pixelating the entire image, except the bounds are now defined between pixelationRect.Min.X and pixelationRect.Max.X for the x dimension and between pixelationRect.Min.Y and pixelationRect.Max.Y for the y dimension (rather than between zero and the image’s width for the x dimension and between zero and the image’s height for the y dimension).
The output image, when size is set to 60, shows the four rectangle-bounded areas filled with large blocks that are each set to the average colour for the corresponding block-area in the original image:
We can, of course, change the value of the size parameter (in this case, from 60 to 12) in order to produce a more subtle pixelization effect, as seen in the image below:
This now looks much more like the sort of pixelization that would be used to obscure parts of an image in real-word applications.