In this tutorial, you will learn how to build traditional web applications and a Go microservice with the Gin framework. Gin is a framework that reduces boilerplate code that would normally go into building these applications. It also lends itself very well to creating reusable and extensible pieces of code.
This part of the tutorial will help you set up your project and build a simple application using Gin that will display a list of articles and the article details page.
Goals
By the end of this tutorial, you will:
- Learn how to use Gin to build a web application,
- Understand the parts of a web application written in Go, and
- Learn how to use Semaphore Continuous Integration to test and build the application quickly and safely.
Prerequisites
For this tutorial, you will need Go, Git, and curl installed on your machine.
You can find the full source of the tutorial in this repository, feel free to fork it:
What is Gin?
Gin is a high-performance micro-framework that can be used to build web applications and microservices. It makes it simple to build a request handling pipeline from modular, reusable pieces. It does this by allowing you to write middleware that can be plugged into one or more request handlers or groups of request handlers.
Why Gin?
One of the best features of Go is that it’s built-in net/http library that allows you to create an HTTP server effortlessly. However, it is also less flexible and requires some boilerplate code to implement.
There is no built-in support in Go to handle routes based on a regular expression or a “pattern”. You can write code to add this functionality. However, as the number of your applications grows, it is quite likely that you will either repeat such code everywhere or create a library for reuse.
This is the crux of what Gin offers. It contains a set of commonly used functionalities, e.g. routing, middleware support, rendering, that reduce boilerplate code and make writing web applications simpler.
Designing the Go Microservice
Let’s take a quick look at how a request is processed in Gin. The control flow for a typical web application, API server or a microservice looks as follows:

When a request comes in, Gin first parses the route. If a matching route definition is found, Gin invokes the route handler and zero or more middleware in an order defined by the route definition. We will see how this is done when we take a look at the code in a later section.
Application Functionality
The application we’ll build is a simple article manager. It will be able to show articles in HTML, JSON and XML as needed. This will allow us to illustrate how Gin can be used to design traditional web applications, API servers, and microservices.
To achieve this, we will make use of the following functionalities offered by Gin:
- Routing — to handle various URLs,
- Custom rendering — to handle the response format, and
- Middleware.
We’ll also write tests to validate that all the features work as intended.
Routing
Routing is one of the core features that all modern frameworks provide. Any web page or an API endpoint is accessed by a URL. Frameworks use routes to handle requests to these URLs. If a URL is http://www.example.com/some/random/route, the route will be /some/random/route.
Gin offers a fast router that’s easy to configure and use. Apart from handling specified URLs, Gin routers can also handle patterns and grouped URLs.
In our application, we will:
- Serve the index page at route
/(HTTP GET request), - Group article related routes under the
/articleroute. Serve the article page at/article/view/:article_id(HTTP GET request). Take note of the:article_idpart in this route. The:at the beginning indicates that this is a dynamic route. This means that:article_idcan contain any value and Gin will make this value available in the route handler.
Rendering
A web application can render a response in various formats like HTML, text, JSON, XML or other formats. API endpoints and microservices typically respond with data, commonly in JSON format but also in any other desired format.
In the next section, we’ll see how we can render different types of responses without duplicating any functionality. We will primarily respond to a request with an HTML template. However, we will also define two endpoints that can respond with JSON or XML data.
Middleware
In the context of a Go web application, middleware is a piece of code that can be executed at any stage while handling an HTTP request. It is typically used to encapsulate common functionality that you want to apply to multiple routes. We can use middleware before and/or after an HTTP request is handled. Some common uses of middleware include authorization, validation, etc.
If middleware is used before a request is handled, any changes it makes to the request will be available in the main route handler. This is handy if we want to implement some validations on certain requests. On the other hand, if the middleware is used after the route handler, it will have a response from the route handler. This can be used to modify the response from the route handler.
Gin allows us to write middleware that implements some common functionality that needs to be shared while handling multiple routes. This keeps the codebase small, separates concerns and improves code maintainability.
We want to ensure that some pages and actions, eg. creating an article, logging out, are available only to users who are logged in. We also want to ensure that some pages and actions, eg. registering, logging in, are available only to users who aren’t logged in.
If we were to put this logic in every route, it would be quite tedious, repetitive and error-prone. Luckily, we can create middleware for each of these tasks and reuse them in specific routes.
We will also create middleware that will be applied to all routes. This middleware (setUserStatus) will check whether a request is from an authenticated user or not. It will then set a flag that can be used in templates to modify the visibility of some of the menu links based on this flag.
Intializing the project
Create (or clone) a GitHub repository and initialize the Go module file:
$ go mod init github.com/YOUR_USERNAME/semaphore-demo-go-gin
$ go get -u github.com/gin-gonic/gin
This application will only use one external dependency: the Gin framework.
Creating Reusable Templates
Our application will display a web page using its template. However, there will be several parts such as the header, menu, sidebar, and footer, which will be common across all pages. Go allows us to create reusable template snippets that can be imported in other templates.
The header and the footer will be the common pieces that will be reused across all templates. We will also create the menu in its own template file which will be used by the header template. Finally, we’ll create the template for the index page which will import the header and the footer. All the template files will be placed in the templates directory within the project directory.
Let’s start by creating the template for the menu in templates/menu.html as follows:
<!--menu.html-->

<nav class="navbar navbar-default">
  <div class="container">
    <div class="navbar-header">
      <a class="navbar-brand" href="/">
        Home
      </a>
    </div>
  </div>
</nav>
Initially, the menu contains only the link to the home page. We will add to this as we add more functionality to the application. The template for the header will be placed in the templates/header.html file as follows:
<!--header.html-->

<!doctype html>
<html>

  <head>
    <!--Use the title variable to set the title of the page-->
    <title>{{ .title }}</title>
    <meta name="viewport" content="width=device-width, initial-scale=1">
    <meta charset="UTF-8">

    <!--Use bootstrap to make the application look nice-->
    <link rel="stylesheet" href="https://maxcdn.bootstrapcdn.com/bootstrap/3.3.6/css/bootstrap.min.css" integrity="sha384-1q8mTJOASx8j1Au+a5WDVnPi2lkFfwwEAa8hDDdjZlpLegxhjVME1fgjWPGmkzs7" crossorigin="anonymous">
    <script async src="https://maxcdn.bootstrapcdn.com/bootstrap/3.3.6/js/bootstrap.min.js" integrity="sha384-0mSbJDEHialfmuBBQP6A4Qrprq5OVfW37PRR3j5ELqxss1yVqOtnepnHVP9aJ7xS" crossorigin="anonymous"></script>
  </head>

  <body class="container">
    <!--Embed the menu.html template at this location-->
    {{ template "menu.html" . }}
And the footer:
<!--footer.html-->

  </body>

</html>
As you can see, we are using the open-source Bootstrap framework. Most of this file is standard HTML. However, take note of two lines. The line containing <title>{{ .title }}</title> is used to dynamically set the title of the page using the .title variable that must be set inside the application. Secondly, the line containing {{ template "menu.html" . }} is used to import the menu template from the menu.html file. This is how Go lets you import one template in another.
The template for the footer contains static HTML. The template for the index page makes use of the header and the footer and displays a simple Hello Gin message:
<!--index.html-->

<!--Embed the header.html template at this location-->
{{ template "header.html" .}}

  <h1>Hello Gin!</h1>

<!--Embed the footer.html template at this location-->
{{ template "footer.html" .}}
Like the index template, templates for other pages will reuse the templates for the header and the footer in a similar manner.
Completing and Validating the Setup
Once you have created the templates, it’s time to create the entry file for your application. We’ll create the main.go file for this with the simplest possible web application that will use the index template. We can do this using Gin in four steps:
1. Create the router
The default way to create a router in Gin is as follows:
router := gin.Default()This creates a router that can be used to define the build of the application.
2. Load the templates
Once you have created the router, you can load all the templates like this:
router.LoadHTMLGlob("templates/*")This loads all the template files located in the templates folder. Once loaded, these don’t have to be read again on every request making Gin web applications very fast.
3. Define the route handler
At the heart of Gin is how you divide the application into various routes and define handlers for each route. We will create a route for the index page and an inline route handler.
router.GET("/", func(c *gin.Context) {

  // Call the HTML method of the Context to render a template
  c.HTML(
      // Set the HTTP status to 200 (OK)
      http.StatusOK,
      // Use the index.html template
      "index.html",
      // Pass the data that the page uses (in this case, 'title')
      gin.H{
          "title": "Home Page",
      },
  )

})
The router.GET method is used to define a route handler for a GET request. It takes in as parameters the route (/) and one or more route handlers which are just functions.
The route handler has a pointer to the context (gin.Context) as its parameter. This context contains all the information about the request that the handler might need to process it. For example, it includes information about the headers, cookies, etc.
The Context also has methods to render a response in HTML, text, JSON and XML formats. In this case, we use the context.HTML method to render an HTML template (index.html). The call to this method includes additional data in which the value of title is set to Home Page. This is a value that the HTML template can make use of. In this case, we use this value in the <title> tag in the header’s template.
4. Start the application
To start the application, you can use the Run method of the router:
router.Run()This starts the application on localhost and serves on the 8080 port by default.
The complete main.go file looks as follows:
// main.go

package main

import (
  "net/http"

  "github.com/gin-gonic/gin"
)

var router *gin.Engine

func main() {

  // Set the router as the default one provided by Gin
  router = gin.Default()

  // Process the templates at the start so that they don't have to be loaded
  // from the disk again. This makes serving HTML pages very fast.
  router.LoadHTMLGlob("templates/*")

  // Define the route for the index page and display the index.html template
  // To start with, we'll use an inline route handler. Later on, we'll create
  // standalone functions that will be used as route handlers.
  router.GET("/", func(c *gin.Context) {

    // Call the HTML method of the Context to render a template
    c.HTML(
      // Set the HTTP status to 200 (OK)
      http.StatusOK,
      // Use the index.html template
      "index.html",
      // Pass the data that the page uses (in this case, 'title')
      gin.H{
        "title": "Home Page",
      },
    )

  })

  // Start serving the application
  router.Run()

}
To execute the application from the command line, go to your application directory and execute the following command:
go build -o appThis will build your application and create an executable named app which you can run as follows:
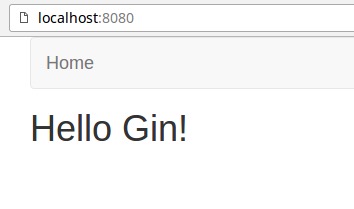
./appIf all goes well, you should be able to access your application at http://localhost:8080 and it should look like this:
The directory structure of your application at this stage should be as follows:
├── main.go
└── templates
    ├── footer.html
    ├── header.html
    ├── index.html
    └── menu.html
Displaying the List of Articles
In this section, we’ll add the functionality to display the list of all articles on the index page.
Since we’ll be displaying the list of articles on the index page, we don’t need to define any additional routes after we’ve refactored the code.
The main.go file should contain the following code:
// main.go

package main

import "github.com/gin-gonic/gin"

var router *gin.Engine

func main() {

  // Set the router as the default one provided by Gin
  router = gin.Default()

  // Process the templates at the start so that they don't have to be loaded
  // from the disk again. This makes serving HTML pages very fast.
  router.LoadHTMLGlob("templates/*")

   // Handle Index
   router.GET("/", showIndexPage)

  // Start serving the application
  router.Run()

}
Designing the Article Model
We will keep the article structure simple with just three fields – Id, Title and Content. This can be represented with a struct as follows:
type article struct {
  ID      int    `json:"id"`
  Title   string `json:"title"`
  Content string `json:"content"`
}
Most applications will use a database to persist the data. To keep things simple, we will keep the list of articles in memory and will initialize the list with two hard-coded articles as follows:
var articleList = []article{
  article{ID: 1, Title: "Article 1", Content: "Article 1 body"},
  article{ID: 2, Title: "Article 2", Content: "Article 2 body"},
}
We will place the above code in a new file named models.article.go. At this stage, we need a function that will return the list of all articles. We will name this function getAllArticles() and place it in the same file. We will also write a test for it. This test will be named TestGetAllArticles and will be placed in the models.article_test.go file.
Let’s start by creating the unit test (TestGetAllArticles) for the getAllArticles() function. After creating this unit test, the models.article_test.go file should contain the following code:
// models.article_test.go

package main

import "testing"

// Test the function that fetches all articles
func TestGetAllArticles(t *testing.T) {
  alist := getAllArticles()

  // Check that the length of the list of articles returned is the
  // same as the length of the global variable holding the list
  if len(alist) != len(articleList) {
    t.Fail()
  }

  // Check that each member is identical
  for i, v := range alist {
    if v.Content != articleList[i].Content ||
      v.ID != articleList[i].ID ||
      v.Title != articleList[i].Title {

      t.Fail()
      break
    }
  }
}
This unit test uses the getAllArticles() function to fetch the list of all articles. This test first makes sure that the article list fetched by this function and the article list present in the global variable articleList are identical. It then loops over the article list to verify that each article is identical. The test fails if either of these two checks fail.
Once we have written the test, we can proceed to write the actual code. The models.article.go file should contain the following code:
// models.article.go

package main

type article struct {
  ID      int    `json:"id"`
  Title   string `json:"title"`
  Content string `json:"content"`
}

// For this demo, we're storing the article list in memory
// In a real application, this list will most likely be fetched
// from a database or from static files
var articleList = []article{
  article{ID: 1, Title: "Article 1", Content: "Article 1 body"},
  article{ID: 2, Title: "Article 2", Content: "Article 2 body"},
}

// Return a list of all the articles
func getAllArticles() []article {
  return articleList
}
Creating the View Template
Since the list of articles will be displayed on the index page, we don’t need to create a new template. However, we do need to change the index.html template to replace the current content with the list of articles.
To make this change, we’ll assume that the list of articles will be passed to the template in a variable named payload. With this assumption, the following snippet should show the list of all articles:
  {{range .payload }}
    <!--Create the link for the article based on its ID-->
    <a href="/article/view/{{.ID}}">
      <!--Display the title of the article -->
      <h2>{{.Title}}</h2>
    </a>
    <!--Display the content of the article-->
    <p>{{.Content}}</p>
  {{end}}
This snippet will loop over all items in the payload variable and display the title and the content of each article. The above snippet will also link to each article. However, since we have not yet defined route handlers for displaying individual articles, these links won’t work as expected.
The updated index.html file should contain the following code:
<!--index.html-->

<!--Embed the header.html template at this location-->
{{ template "header.html" .}}

  <!--Loop over the payload variable, which is the list of articles-->
  {{range .payload }}
    <!--Create the link for the article based on its ID-->
    <a href="/article/view/{{.ID}}">
      <!--Display the title of the article -->
      <h2>{{.Title}}</h2>
    </a>
    <!--Display the content of the article-->
    <p>{{.Content}}</p>
  {{end}}

<!--Embed the footer.html template at this location-->
{{ template "footer.html" .}}
Specifying the Requirement for the Route Handler With a Unit Test
Before we create the handler for the index route, we will create a test to define the expected behavior of this route handler. This test will check for the following conditions:
- The handler responds with an HTTP status code of 200,
- The returned HTML contains a title tag containing the text
Home Page.
The code for the test will be placed in the TestShowIndexPageUnauthenticated function in the handlers.article_test.go file. We will place helper functions used by this function in the common_test.go file.
The content of handlers.article_test.go is as follows:
// handlers.article_test.go

package main

import (
  "io/ioutil"
  "net/http"
  "net/http/httptest"
  "strings"
  "testing"
)

// Test that a GET request to the home page returns the home page with
// the HTTP code 200 for an unauthenticated user
func TestShowIndexPageUnauthenticated(t *testing.T) {
  r := getRouter(true)

  r.GET("/", showIndexPage)

  // Create a request to send to the above route
  req, _ := http.NewRequest("GET", "/", nil)

  testHTTPResponse(t, r, req, func(w *httptest.ResponseRecorder) bool {
    // Test that the http status code is 200
    statusOK := w.Code == http.StatusOK

    // Test that the page title is "Home Page"
    // You can carry out a lot more detailed tests using libraries that can
    // parse and process HTML pages
    p, err := ioutil.ReadAll(w.Body)
    pageOK := err == nil && strings.Index(string(p), "<title>Home Page</title>") > 0

    return statusOK && pageOK
  })
}
The content of common_test.go is as follows:
package main

import (
  "net/http"
  "net/http/httptest"
  "os"
  "testing"

  "github.com/gin-gonic/gin"
)

var tmpArticleList []article

// This function is used for setup before executing the test functions
func TestMain(m *testing.M) {
  //Set Gin to Test Mode
  gin.SetMode(gin.TestMode)

  // Run the other tests
  os.Exit(m.Run())
}

// Helper function to create a router during testing
func getRouter(withTemplates bool) *gin.Engine {
  r := gin.Default()
  if withTemplates {
    r.LoadHTMLGlob("templates/*")
  }
  return r
}

// Helper function to process a request and test its response
func testHTTPResponse(t *testing.T, r *gin.Engine, req *http.Request, f func(w *httptest.ResponseRecorder) bool) {

  // Create a response recorder
  w := httptest.NewRecorder()

  // Create the service and process the above request.
  r.ServeHTTP(w, req)

  if !f(w) {
    t.Fail()
  }
}

// This function is used to store the main lists into the temporary one
// for testing
func saveLists() {
  tmpArticleList = articleList
}

// This function is used to restore the main lists from the temporary one
func restoreLists() {
  articleList = tmpArticleList
}
To implement this test, we have written some helper functions. These will also help us reduce boilerplate code when we write additional tests to test similar functionality.
The TestMain function sets Gin to use the test mode and calls the rest of the test functions. The getRouter function creates and returns a router in a manner similar to the main application. The saveLists() function saves the original article list in a temporary variable. This temporary variable is used by the restoreLists() function to restore the article list to its initial state after a unit test is executed.
Finally, the testHTTPResponse function executes the function passed in to see if it returns a boolean true value — indicating a successful test, or not. This function helps us avoid duplicating the code needed to test the response of an HTTP request.
To check the HTTP code and the returned HTML, we’ll do the following:
- Create a new router,
- Define a route to use the same handler that the main app uses (
showIndexPage), - Create a new request to access this route,
- Create a function that processes the response to test the HTTP code and HTML, and
- Call
testHTTPResponse()with this new function to complete the test.
Creating the Route Handler
We will create all route handlers for article related functionality in the handlers.article.go file. The handler for the index page, showIndexPage performs the following tasks:
1. Fetches the list of articles
This can be done using the getAllArticles function defined previously:
articles := getAllArticles()2. Renders the index.html template passing it the article list
This can be done using the code below:
c.HTML(
    // Set the HTTP status to 200 (OK)
    http.StatusOK,
    // Use the index.html template
    "index.html",
    // Pass the data that the page uses
    gin.H{
        "title":   "Home Page",
        "payload": articles,
    },
)
The only difference from the version in the previous section is that we’re passing the list of articles which will be accessed in the template by the variable named payload.
The handlers.article.go file should contain the following code:
// handlers.article.go
package main
import (
"net/http"
"github.com/gin-gonic/gin"
)
func showIndexPage(c *gin.Context) {
articles := getAllArticles()
// Call the HTML method of the Context to render a template
c.HTML(
// Set the HTTP status to 200 (OK)
http.StatusOK,
// Use the index.html template
"index.html",
// Pass the data that the page uses
gin.H{
"title": "Home Page",
"payload": articles,
},
)
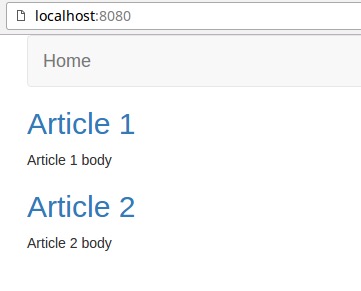
}If you now build and run your application and visit http://localhost:8080 in a browser, it should look like this:
These are the new files added in this section:
├── common_test.go
├── handlers.article.go
├── handlers.article_test.go
├── models.article.go
└── models.article_test.go
Displaying a Single Article
In the last section, while we displayed a list of articles, the links to the articles didn’t work. In this section, we’ll add handlers and templates to display an article when it is selected.
Setting Up the Route
We can set up a new route to handle requests for a single article in the same manner as in the previous route. However, we need to account for the fact that while the handler for all articles would be the same, the URL for each article would be different. Gin allows us to handle such conditions by defining route parameters as follows:
router.GET("/article/view/:article_id", getArticle)This route will match all requests matching the above path and will store the value of the last part of the route in the route parameter named article_id which we can access in the route handler. For this route, we will define the handler in a function named getArticle.
The updated main.go file should contain the following code:
func main() {

    router := gin.Default()
    router.LoadHTMLGlob("templates/*")

    // Handle Index
    router.GET("/", showIndexPage)
    // Handle GET requests at /article/view/some_article_id
    router.GET("/article/view/:article_id", getArticle)

    router.Run()
}

. . .
Creating the View Templates
We need to create a new template at templates/article.html to display the content of a single article. This can be created in a manner similar to the index.html template. However, instead of the payload variable containing the list of articles, in this case it will contain a single article.
Create the article template in templates/article.html:
<!--article.html-->

<!--Embed the header.html template at this location-->
{{ template "header.html" .}}

<!--Display the title of the article-->
<h1>{{.payload.Title}}</h1>

<!--Display the content of the article-->
<p>{{.payload.Content}}</p>

<!--Embed the footer.html template at this location-->
{{ template "footer.html" .}}
Specifying the Requirement for the Go Microservice Router
The test for the handler of this route will check for the following conditions:
- The handler responds with an HTTP status code of 200,
- The returned HTML contains a title tag containing the title of the article that was fetched.
The code for the test will be placed in the TestArticleUnauthenticated function in the handlers.article_test.go file. We will place helper functions used by this function in the common_test.go file.
Creating the Route Handler
The handler for the article page, getArticle performs the following tasks:
1. Extracts the ID of the article to display
To fetch and display the right article, we first need to extract its ID from the context. This can be extracted as follows:
c.Param("article_id")where c is the Gin Context which is a parameter to any route handler when using Gin.
2. Fetches the article
This can be done using the getArticleByID() function defined in the models.article.go file:
article, err := getArticleByID(articleID)After adding getArticleByID, the models.article.go file should look like this:
// models.article.go

package main

import (
  "errors"
)

type article struct {
  ID      int    `json:"id"`
  Title   string `json:"title"`
  Content string `json:"content"`
}

// For this demo, we're storing the article list in memory
// In a real application, this list will most likely be fetched
// from a database or from static files
var articleList = []article{
  article{ID: 1, Title: "Article 1", Content: "Article 1 body"},
  article{ID: 2, Title: "Article 2", Content: "Article 2 body"},
}

// Return a list of all the articles
func getAllArticles() []article {
  return articleList
}

func getArticleByID(id int) (*article, error) {
  for _, a := range articleList {
    if a.ID == id {
      return &a, nil
    }
  }
  return nil, errors.New("Article not found")
}
This function loops through the article list and returns the article whose ID matches the ID passed in. If no matching article is found it returns an error indicating the same.
3. Renders the article.html template passing it the article
This can be done using the code below:
c.HTML(
    // Set the HTTP status to 200 (OK)
    http.StatusOK,
    // Use the article.html template
    "article.html",
    // Pass the data that the page uses
    gin.H{
        "title":   article.Title,
        "payload": article,
    },
)
The updated handlers.article.go file should contain the following code:
// handlers.article.go

package main

import (
  "net/http"
  "strconv"

  "github.com/gin-gonic/gin"
)

func showIndexPage(c *gin.Context) {
  articles := getAllArticles()

  // Call the HTML method of the Context to render a template
  c.HTML(
    // Set the HTTP status to 200 (OK)
    http.StatusOK,
    // Use the index.html template
    "index.html",
    // Pass the data that the page uses
    gin.H{
      "title":   "Home Page",
      "payload": articles,
    },
  )

}

func getArticle(c *gin.Context) {
  // Check if the article ID is valid
  if articleID, err := strconv.Atoi(c.Param("article_id")); err == nil {
    // Check if the article exists
    if article, err := getArticleByID(articleID); err == nil {
      // Call the HTML method of the Context to render a template
      c.HTML(
        // Set the HTTP status to 200 (OK)
        http.StatusOK,
        // Use the index.html template
        "article.html",
        // Pass the data that the page uses
        gin.H{
          "title":   article.Title,
          "payload": article,
        },
      )

    } else {
      // If the article is not found, abort with an error
      c.AbortWithError(http.StatusNotFound, err)
    }

  } else {
    // If an invalid article ID is specified in the URL, abort with an error
    c.AbortWithStatus(http.StatusNotFound)
  }
}
If you now build and run your application and visit http://localhost:8080/article/view/1 in a browser, it should look like this:

The new files added in this section are as follows:
└── templates
    └── article.html
Responding With JSON/XML
In this section, we will refactor the application a bit so that, depending on the request headers, our application can respond in HTML, JSON or XML format.
Creating a Reusable Function
So far, we’ve been using the HTML method of Gin’s context to render directly from route handlers. This is fine when we always want to render HTML. However, if we want to change the format of the response based on the request, we should refactor this part out into a single function that takes care of the rendering. By doing this, we can let the route handler focus on validation and data fetching.
A route handler has to do the same kind of validation, data fetching and data processing irrespective of the desired response format. Once this part is done, this data can be used to generate a response in the desired format. If we need an HTML response, we can pass this data to the HTML template and generate the page. If we need a JSON response, we can convert this data to JSON and send it back. Likewise for XML.
We’ll create a render function in main.go that will be used by all the route handlers. This function will take care of rendering in the right format based on the request’s Accept header.
In Gin, the Context passed to a route handler contains a field named Request. This field contains the Header field which contains all the request headers. We can use the Get method on Header to extract the Accept header as follows:
// c is the Gin Context
c.Request.Header.Get("Accept")- If this is set to
application/json, the function will render JSON, - If this is set to
application/xml, the function will render XML, and - If this is set to anything else or is empty, the function will render HTML.
The render function is as follows, add it in the handlers.article.go file:
// Render one of HTML, JSON or CSV based on the 'Accept' header of the request
// If the header doesn't specify this, HTML is rendered, provided that
// the template name is present
func render(c *gin.Context, data gin.H, templateName string) {

  switch c.Request.Header.Get("Accept") {
  case "application/json":
    // Respond with JSON
    c.JSON(http.StatusOK, data["payload"])
  case "application/xml":
    // Respond with XML
    c.XML(http.StatusOK, data["payload"])
  default:
    // Respond with HTML
    c.HTML(http.StatusOK, templateName, data)
  }

}
Modifying the Requirement for the Route Handlers With a Unit Test
Since we are now expecting JSON and XML responses if the respective headers are set, we should add tests to the handlers.article_test.go file to test these conditions. We will add tests to:
- Test that the application returns a JSON list of articles when the
Acceptheader is set toapplication/json - Test the application returns an article in XML format when the
Acceptheader is set toapplication/xml
These will be added as functions named TestArticleListJSON and TestArticleXML.
Updating the Route Handlers
The route handlers don’t really need to change much as the logic for rendering in any format is pretty much the same. All that needs to be done is use the render function instead of rendering using the c.HTML methods.
For example, the showIndexPage route handler in handler.article.go will change from:
func showIndexPage(c *gin.Context) {
  articles := getAllArticles()

  // Call the HTML method of the Context to render a template
  c.HTML(
    // Set the HTTP status to 200 (OK)
    http.StatusOK,
    // Use the index.html template
    "index.html",
    // Pass the data that the page uses
    gin.H{
      "title":   "Home Page",
      "payload": articles,
    },
  )

}
to:
func showIndexPage(c *gin.Context) {
  articles := getAllArticles()

  // Call the render function with the name of the template to render
  render(c, gin.H{
    "title":   "Home Page",
    "payload": articles}, "index.html")

}
Retrieving the List of Articles in JSON Format
To see our latest updates in action, build and run your application. Then execute the following command:
curl -X GET -H "Accept: application/json" http://localhost:8080/This should return a response as follows:
[{"id":1,"title":"Article 1","content":"Article 1 body"},{"id":2,"title":"Article 2","content":"Article 2 body"}]As you can see, our request got a response in the JSON format because we set the Accept header to application/json.
Retrieving an Article in XML Format
Let’s now get our application to respond with the details of a particular article in the XML format. To do this, first, start your application as mentioned above. Now execute the following command:
curl -X GET -H "Accept: application/xml" http://localhost:8080/article/view/1This should return a response as follows:
<article><ID>1</ID><Title>Article 1</Title><Content>Article 1 body</Content></article>As you can see, our request got a response in the XML format because we set the Accept header to application/xml.
Testing the Application
Since we’ve been using tests to create specifications for our route handlers and models, we should constantly be running them to ensure that the functions work as expected. Let’s now run the tests that we have written and see the results. In your project directory, execute the following command:
go test -vExecuting this command should result in something similar to this:
=== RUN   TestShowIndexPageUnauthenticated
[GIN] 2022/05/11 - 11:33:20 | 200 |     429.084µs |                 | GET      "/"
--- PASS: TestShowIndexPageUnauthenticated (0.00s)
=== RUN   TestGetAllArticles
--- PASS: TestGetAllArticles (0.00s)
PASS
ok  	github.com/tomfern/semaphore-demo-go-gin	0.704s
As can be seen in this output, this command runs all the tests that we have written and, in this case, indicates that our application is working as we intend it to. If you take a close look at the output, you’ll notice that Go made HTTP requests in the course of testing the route handlers.
Continuous Integration for Go on Semaphore
Continuous Integration (CI) can test and build the application for us in a fast and clean environment. When we are ready to publish, Continuous Delivery (CD) can make the releases, secure in the knowledge that the code passed all our tests.
First, we have to get all the code in GitHub:
- If you created the application from scratch:
- Create a GitHub repository.
- Push all your code:
$ git init
$ git remote add YOUR_REPOSITORY_URL
$ git add -A
$ git commit -m "initial commit"
$ git push origin main- If you prefer to work with a ready-to-use example:
- Go to the example repository and fork it and clone it.
Add Semaphore to Your Project
Adding CI/CD to your project is completely free and takes only a few minutes:
- Sign up for a free Semaphore account.
- Click on Create new on the top navigation bar.
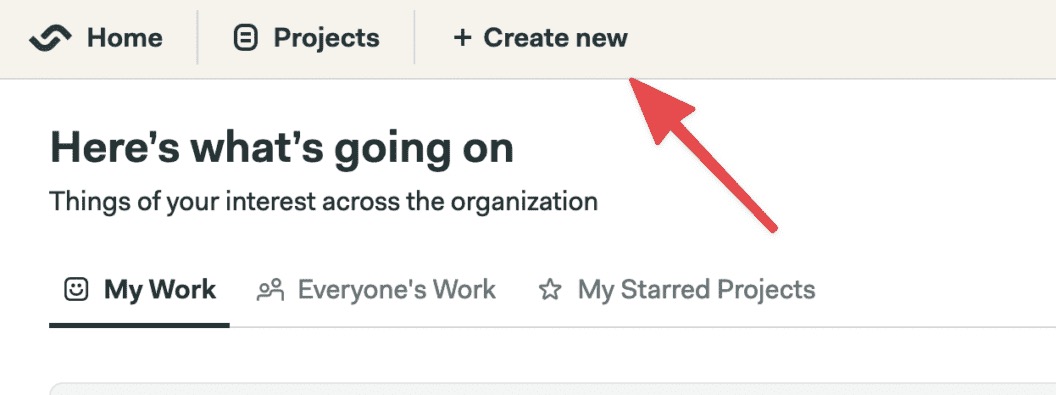
- Find you project and click on Choose:
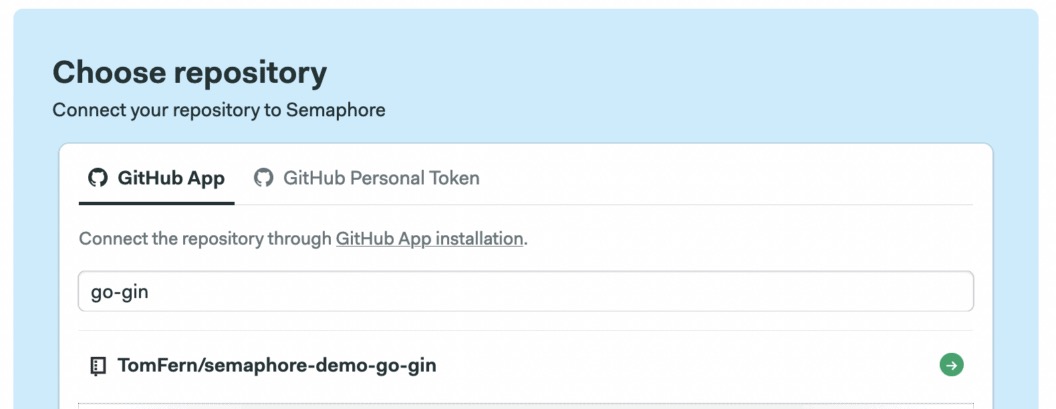
- Select the Go starter workflow and click on Customize:
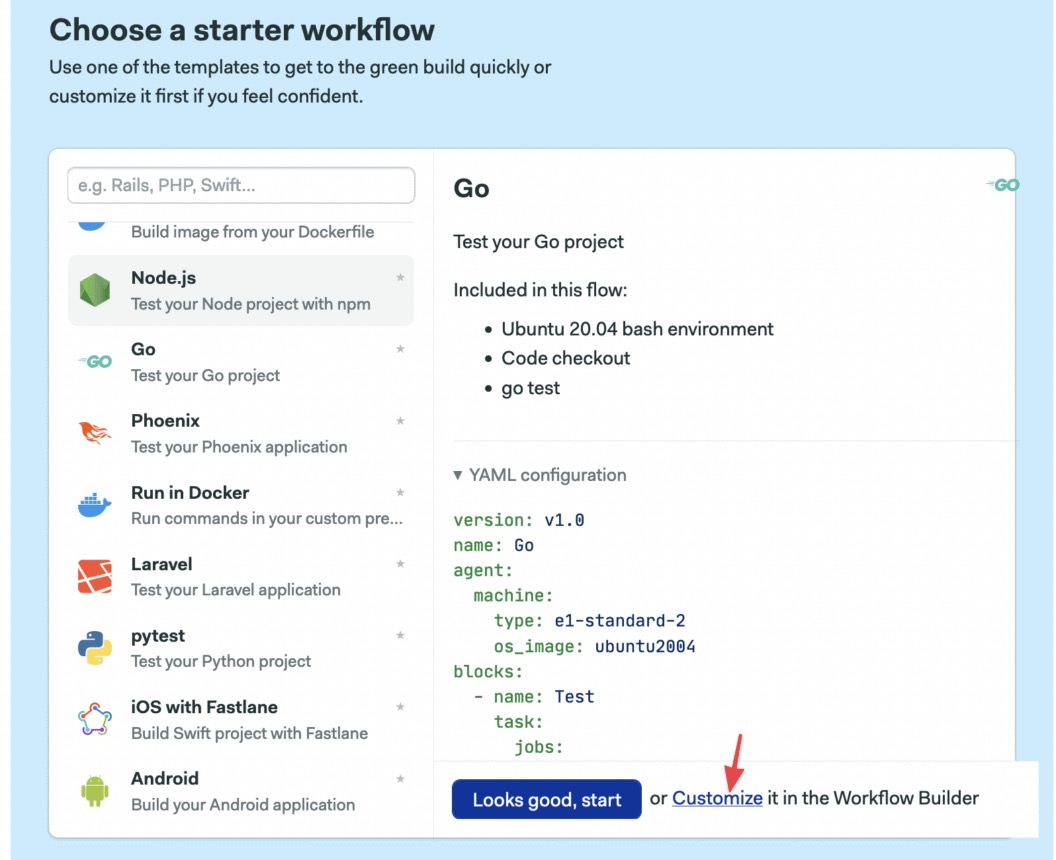
- Replace the first line in the job command with:
sem-version go 1.18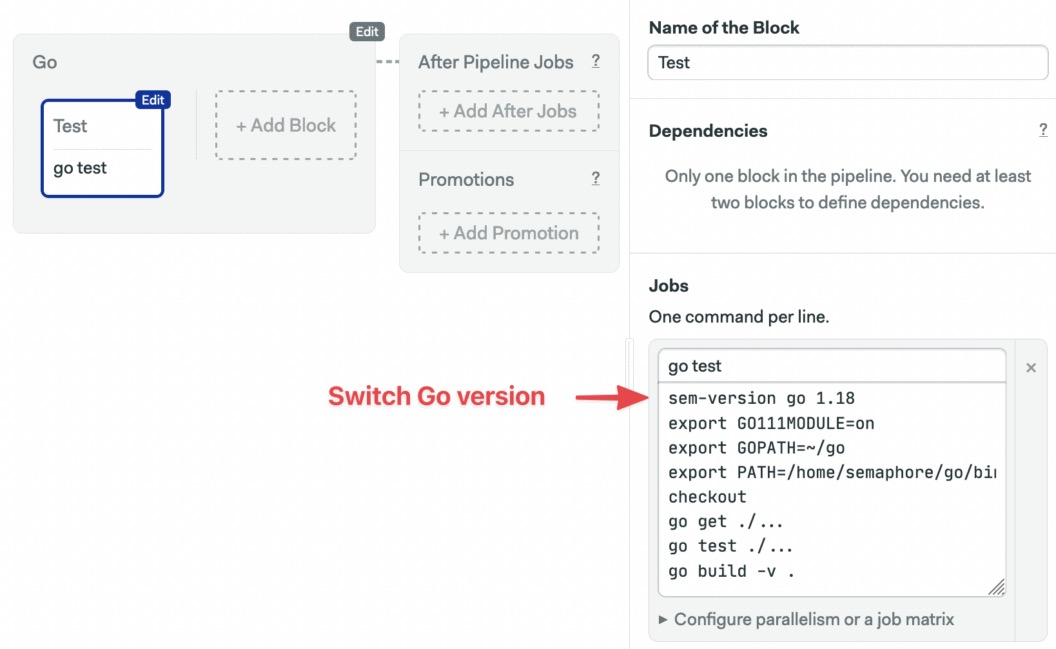
- Click on Run the workflow > Start.
That’s it, on every push the CI pipeline will test and build the application.
Improving the Pipeline
The starter CI pipeline should work seamlessly without any additional setup. We can, however, make some improvements:
- Dependencies have to be downloaded every time. We can use a cache to keep them and speed up things.
- Testing and building are on the same job. We should split it in different jobs so it’s easier for us to later add more tests.
Use the Edit Workflow button to open the Workflow Builder:
The main elements of the builder are:
- Pipeline: A pipeline has a specific objective, e.g. testing. Pipelines are made of blocks that are executed from left to right in an agent.
- Agent: The agent is the virtual machine that powers the pipeline. We have three machine types to choose from. The machine runs an optimized Ubuntu 20.04 image with build tools for many languages.
- Block: blocks group jobs that can be executed in parallel. Jobs in a block usually have similar commands and configurations. Once all jobs in a block complete, the next block begins.
- Job: jobs define the commands that do the work. They inherit their configuration from their parent block.
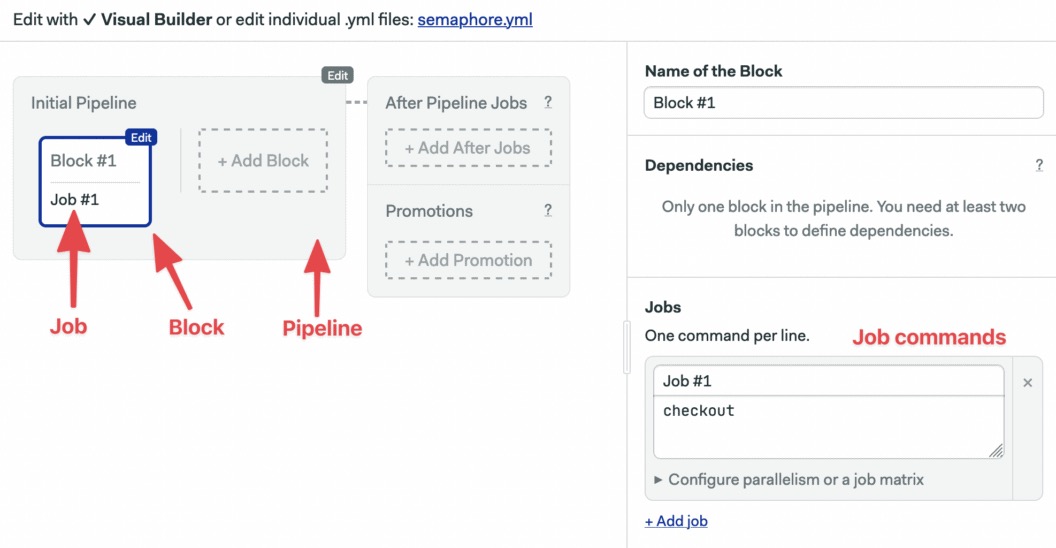
We’ll make an improved version of the first block:
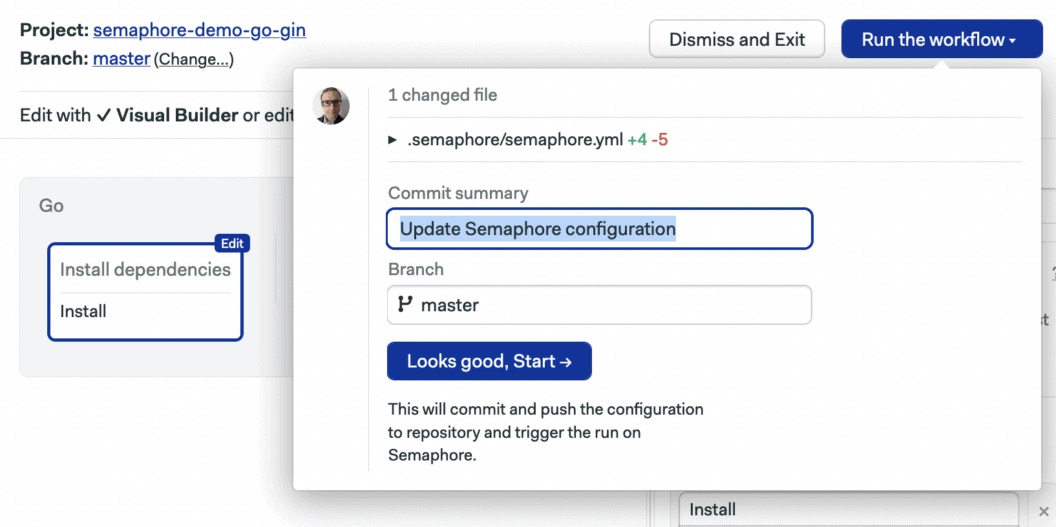
- Click on the first block and change its name to: “Install dependencies”.
- Below you’ll find the job, change its name to “Install” and type the following commands in the box:
sem-version go 1.18
export GO111MODULE=on
export GOPATH=~/go
export PATH=/home/semaphore/go/bin:$PATH
checkout
cache restore
go mod vendor
cache store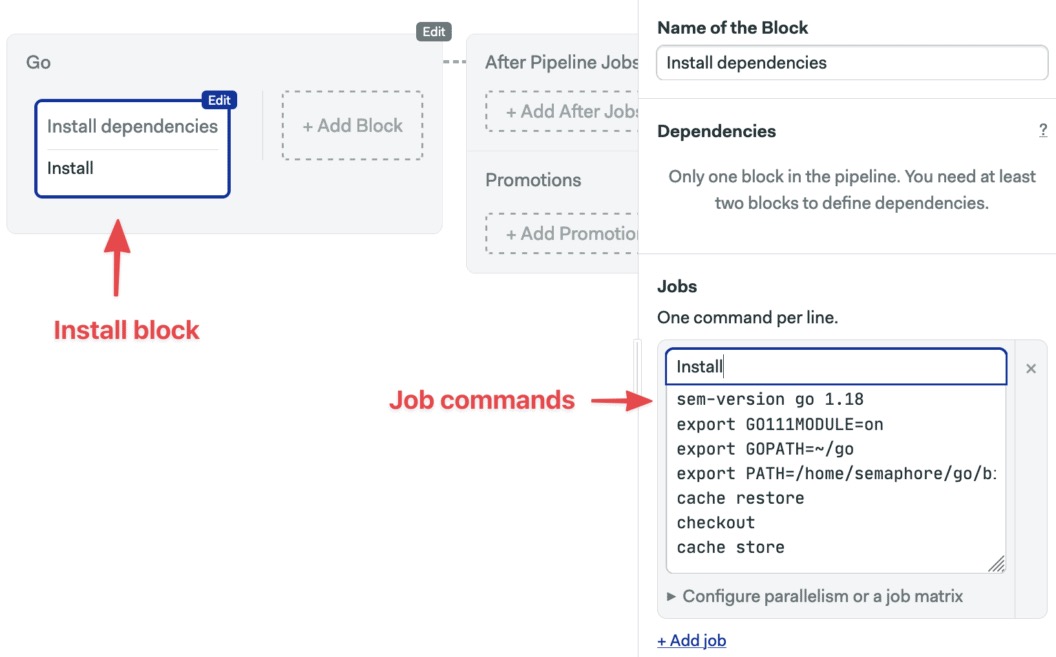
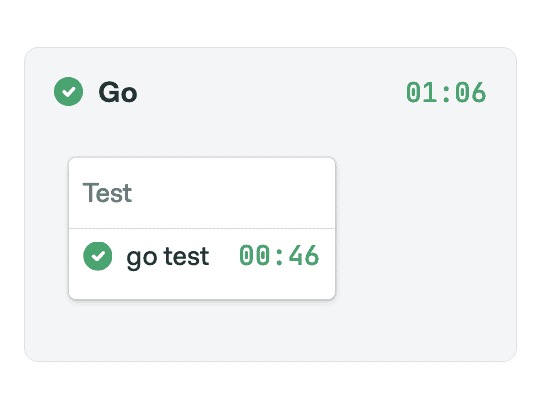
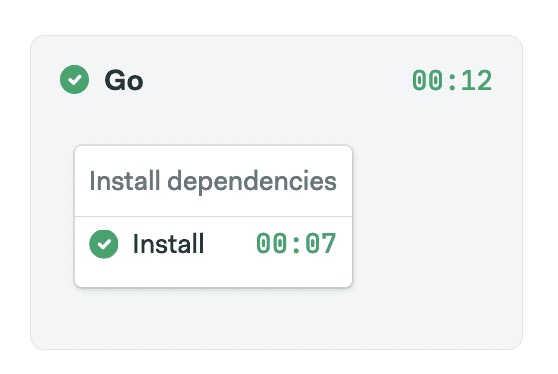
- Click on Run the Workflow on the top-right corner and then Start:
We’ve modified the block so it only downloads the Go dependencies:
- sem-version: a Semaphore built-in command to manage programming language versions. Semaphore supports most Go versions.
- checkout: another built-in command, checkout clones the repository and changes the current directory.
- go mod vendor: this a Go command that downloads the dependencies into the vendor directory, so they can be cached.
- cache: the cache commands provides read and write access to Semaphore’s cache, a project-wide storage for the jobs.
The first time that the jobs run, Go will download the dependencies and Semaphore will store them in the cache. For all the following runs, Semaphore will restore them and Go won’t need to download them again, thus speeding up the process considerably.
Testing with Semaphore
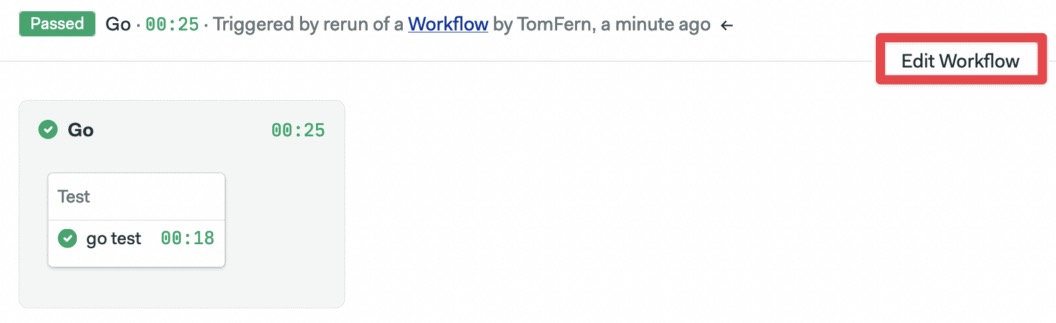
We expect our CI pipeline to be able to test the project and build a binary. We’ll add two more blocks for that:
- Click on Edit Workflow
- Use the +Add Block dotted line button to create a new block. Name the block “Test”
- Open the Prologue section and type the following commands. The commands are executed before all jobs in the block:
sem-version go 1.18
export GO111MODULE=on
export GOPATH=~/go
export PATH=/home/semaphore/go/bin:$PATH
checkout
cache restore
go mod vendor- Set the name of the job to “Test” and type the following command:
go test ./...Go microservice
- Add the third block, let’s call it “Build”
- Repeat the Prologue and Environment Variables steps as before.
- Set the name of the job to “Build”
- Type the following commands in the box:
go build -v -o go-gin-app
artifact push project --force go-gin-app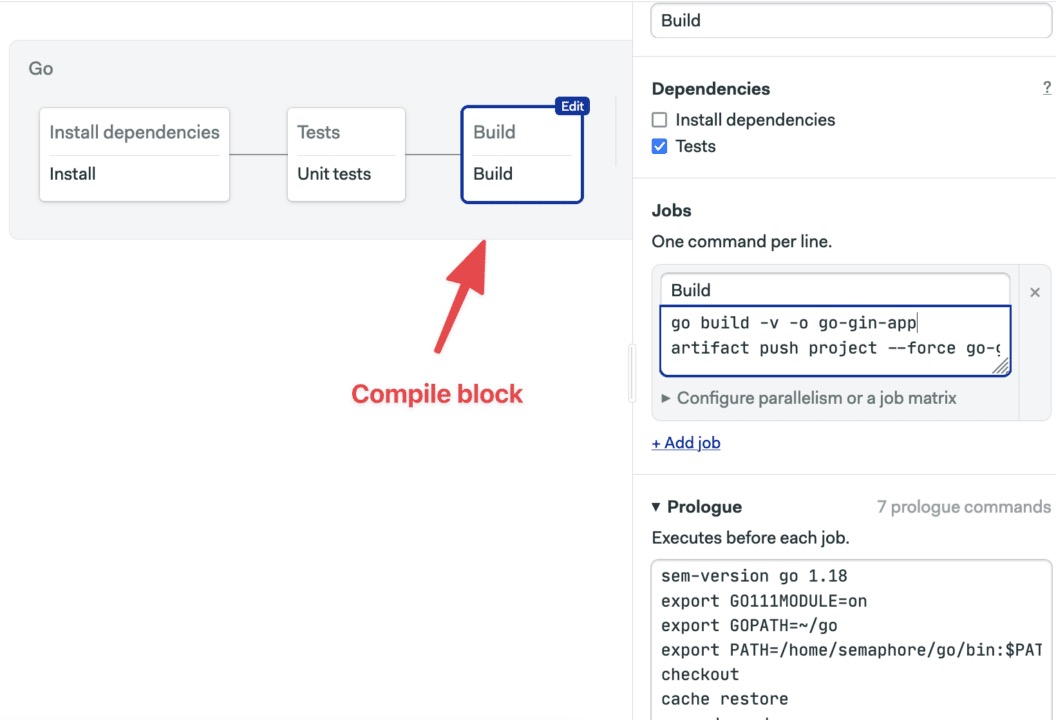
- Click on Run the Workflow and then Start.
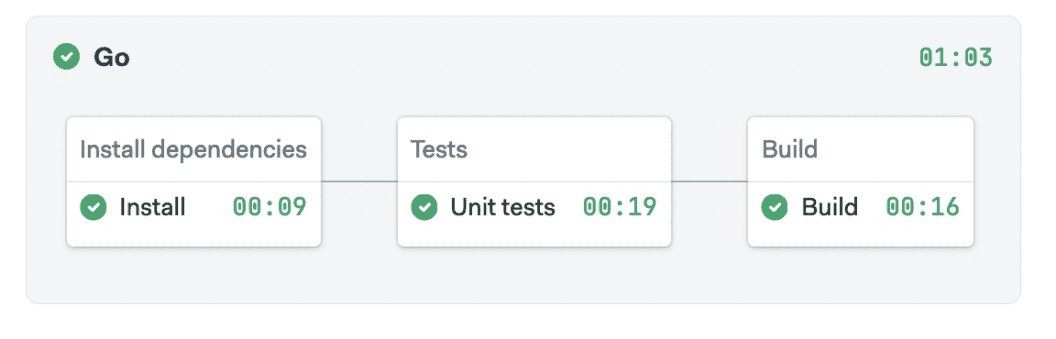
The updated pipeline is now complete:
The artifact command we used in the build job uploads the binary into the project’s storage. To access it, use the Project Artifact button:
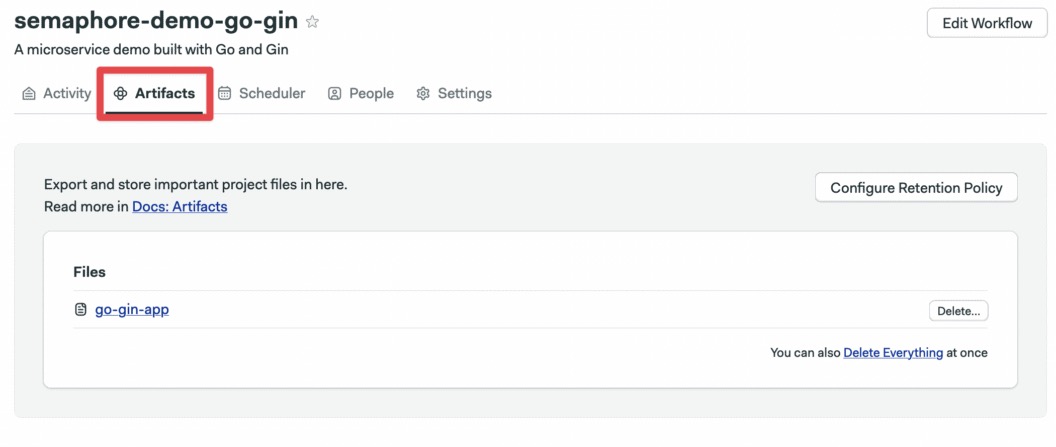
Semaphore has three separate artifact stores: Job, Workflow, and Project. For more information, check the artifacts doc.
Conclusion
In this tutorial, we created a new web application using Gin and gradually added more functionality. We used tests to build robust route handlers and saw how we can reuse the same code to render a response in multiple formats with minimal effort.
The code for the entire application is available in this Github repository.
Gin is easy to get started with—coupled with Go’s built-in functionality, its features make building high quality, well-tested web applications and microservices a breeze. If you have any questions or comments, feel free to post them below.
Hello, I’m new in Software Developer section since I am starting my career in it, however I’ve been studying Go as well as Gin. My question is regarding the “Microservice” tag that you put. Reading the source code, I am confused why you would call the app a “microservice” app. In my definition, microservices apps are apps that has loosely coupled services and each services has its own business logic and database. In microservice, one service would communicate with other services via RPC, HTTP, Messaging Queue, or others (in my thoughts). It is true that a microservice could be a monorepo or a polyrepo. While reading the source code, instead I view the app as monolithic. Would you mind enlightening me regarding my view about microservice and monolithic apps? Thank you so much and I appreciate the post.